Getting Started Salto
This tutorial shows all the steps needed to configure Meshtech devices to operate together with SALTO SPACE to perform action such as remote opening while wearing a Meshtech wristband.
In this tutorial we will use these devices:
| Device | Role |
|---|---|
| Compulab IOT-GATE-IMX8PLUS 2031 | gateway |
| Raytac MDBT50Q-RX 0040 | extender |
| Raytac MDBT50Q-RX 0040 | door scanner |
| MT Wristband 211 (0063) | wristband |
Device Management Portal
Configuration of all Meshtech devices is done through Management Portal.
A link with invitation and instructions should be received by e-mail for new customers. Existing customers can ask their admin user to create a user for them.
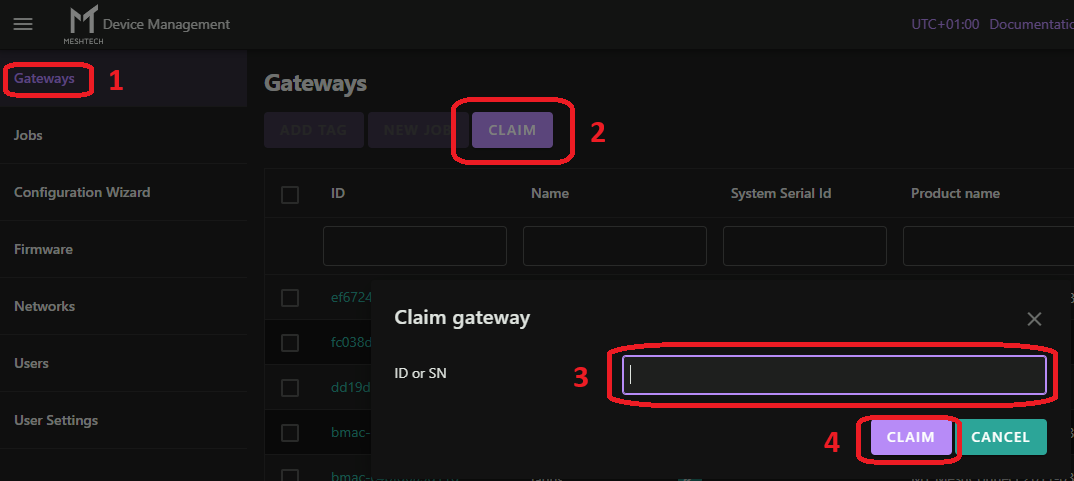
Claim your Gateway
First you need to power on the gateway and make sure it can reach the internet. Gateway needs to be given IP address and network configuration with DHCP, and it needs to be allowed access to go out on TCP port 8883 plus perform DNS query. After logging in to the portal, you will see a list of all gateways associated with your user/customer. If you do not see the gateway you are trying to control/configure, you need to claim it. To add a gateway you own, use the Claim button and type in the gateway ID or SN. In this case we will use SN (serial number) to claim the gateway. SN is printed on a sticker on the gateway box and the back of the gateway:
Configure the gateway
After successful claim, gateway should now be listed in your available gateways to configure and interact with. Gateway ID is BLE MAC address of the BLE adapter.
If you click it, you get more information, and can confirm that it is the correct one by the System Serial Id.
Provision the gateway
To communicate securely and guarantee data validity, devices must be provisioned to a secure Meshtech network. You can generate your own random key and keep track of it yourself, or you can use the Meshtech Device Management portal. If you wish to use our portal to keep track of it:
- Start by generating a new key and saving it.
- Go to Networks and click Add. In the popup, click Generate to generate a new random key. Give it a Name you can remember and click Add.
- Now we need to provision the gateway to use this key.
- Go to Gateways, click the Gateway ID of your gateway, and click Provision. Select the network you created in the dropdown and click Provision.
Activate the gateway
Gateway needs to be activated to work. This is done in the Activation tab by clicking Activate.
Note
If activation is done before provisioning to secure network, gateway will start in legacy mode. It is recommended to provision before activating or unauthenticated legacy data will arrive.
Configure Salto Connection
Gateway needs to be configured to know where to reach the Salto system. This is done through the property salto-config. To set salto-config you need to interact with the gateway. This is done by going to either Network or Devices tab, click Request (to fetch gateway and nearby network/devices from gateway) then clicking on gateway MAC address.

If you want gateway to use HTTPS when connecting to Salto, you might need to add a certificate before setting salto-config and specify "https://" in the endpoint. Additional certificates management is described in gateway section Root Certificates Management.
Write salto-config in the Property textbox and move cursor to the Value(JSON) field and fill in desired config. Press Write to write value when you have entered the desired config. Example value:
{
  "endpoint": "http://desktop-b838adn.local:8100",
  "apiKey": "salto2025",
  "doorGpf": 1,
  "userGpf": 1
}
Required fields are endpoint and apiKey (password entered in Salto SPACE SHIP configuration). doorGpf and userGpf are optional fields if you wish to use other than the first general purpose field in space to enter Meshtech device config.
It is possible to read back salto-config, but now apiKey will be redacted (not included).
Enabling Devices
We have now configured the gateway, and we can start enabling our BLE devices through this gateway. By default, all Meshtech devices are delivered in Storage mode.
To enable a device you must:
- Wake up the device (so that it starts advertising)
- Provision the device. This will give validated Meshtech devices the network key, and you can select the device-mode you want the device to operate in at the same time.
The Raytac-MDBT50Q-RX extender woken up simply by applying power (5VDC USB-A). Provision is done through the gateway (directly or via an network of extenders).
- Start by clicking the gateway ID of your gateway.
- Select Devices tab and click Request button to fetch a list of devices the gateway has observed. This will likely be a very short list at this point, unless you have several enabled devices nearby already. Click Switch network mode button and select "Discovery" from the dropdown.
- Start by enabling extenders, Raytac-MDBT50Q-RX in this case.
- To wake up the device, apply power to the extender. Battery powered devices require 1s+ button press to wake. For battery powered devices, make sure battery is installed or device is charged before pressing the button.
- Click Request button again, this device should now be found in the list, in storage mode.
- Click Network Id of device you wish to provision. It should be "0000000000" for un-provisioned devices. Select Device Mode ("Connected" for Raytac-MDBT50Q, "Unconnected" for Wristbands) and click Provision.
- The device will now receive network key and switch to selected mode.
- Repeat steps 4-7 for all the devices you wish to enable, keeping in mind that some devices (wristbands/trackers) typically operate in unconnected mode, so select Unconnected for those in step 6 instead of Connected.
- When you are done provisioning devices, click Switch network mode and select "Scan" to go back to normal operation mode.
Configuration required in Salto SPACE
To configure which dongle is associated to which door, and which wristband is associated with what user, it is necessary to add this information to Salto SPACE.
Door
MAC address of dongle associated to each door need to be entered in the corresponding door in SPACE. There is a COPY ID button available in the Interact dialog that can be used to put MAC into clipboard.
User
MAC address of wristband associated with the user need to be added to each user in Salto SPACE. Optionally, it is possible to specify a feature NEAR for this user by adding comma "," followed by the text NEAR. Specifying NEAR means device has to be very NEAR door scanner to open a door. This can be suitable for f.ex. nurses that does not want to open door when walking down the hallway, but can still use a Meshtech device to open door by holding it near.
After Door or User MAC addresses has been added to SPACE, their names will appear as Alias in the Meshtech Device Management Portal for ease of use. It will take up to 1 minute for these names to sync to Meshtech gateway, and require a new "Request" click from the Meshtech Device Management Portal to show up.
Salto specific properties in gateway
| Property | Description |
|---|---|
| salto-config | Salto configuration. Set to null when disabled. |
Recommended adjustments for Door scanner dongle Raytac-MDBT50Q-RX
To make the best possible experience and responsiveness for opening doors we recommend re-configuring the following properties:
rssi-throttling-mode
value:
{
  "mode": 1,
  "interval": 10,
  "farRssiThreshold": -55,
  "nearRssiThreshold": -40
}
Note
farRssiThreshold value can be used to adjust range of how far away door opening will trigger. Lower number (more negative) will result in opening further away. i.e. -60 will open further away than -55.
Note
While wristband with access is within farRssiThreshold, new open door will be sent every interval seconds. Interval should be several seconds lower than salto door open time to prevent opening and closing while standing near door.
scan-window
value: 95
downlink-configuration-2
value:
{
  "extenders": 0,
  "nodes": 0,
  "temporary": 0,
  "max": 0
}
Recommended adjustments for Wristbands
To make the best possible experience and responsiveness for opening doors we recommend re-configuring the following properties:
normal-mode-advertisement-interval
value:
{
    "interval": 200,
    "denominator": 15
}
alarm-mode
value: 0
Disabling alarm-mode is advised to make sure no excessive power is used in wristbands when no patient alarm system is in use.