Getting Started with Skyresponse
This tutorial shows all the steps needed to configure a gateway and Meshtech devices to report alarms to Skyresponse. It will briefly introduce the concepts performed in each step.
In this tutorial we will use these devices:
Device |
Role |
|---|---|
gateway |
|
extender |
|
wristband |
|
care provider badge |
If you have different devices than listed, the procedure should be quite similar, but some details might differ slightly. Visit the documentation for your particular device if needed. See Supported Devices for the devices that support Skyresponse.
All configuration of the Meshtech gateway and devices is done in the Meshtech Device Management Portal.
A link with invitation and instructions should be received by e-mail for new customers. Existing customers can ask their admin user to create a user for them.
Claim Your Gateway
Power up the gateway (PoE or 12-24VDC). The gateway needs to get IP/network settings by DHCP on the Ethernet port, and must be allowed to reach the internet (MQTT with TLS on port 8883, and DNS query). If it is the first time powering up the gateway, wait for LED A to light green before claiming it.
After logging in to the portal, you will see a list of all gateways associated with your user/customer. If you do not see the gateway you are trying to control/configure, you need to claim it. To add a gateway you own, use the Claim button and type in the gateway ID. The BLE MAC address of the gateway will be used as gateway’s ID. Use gateway ID or CTHINGS.CO serial number (SN) for claiming. If gateway is successfully powered on, with an internet connection it should have a green symbol in the connectivity column. This means it is accessible to interact with from the portal and we can move to the next step. If the connectivity status is not green, you can try to click the Sync at the bottom of the Information tab.
Choose a Network Key
Skyresponse requires timestamped alarms, which are only available in secure mode. Devices must therefore be provisioned to a secure Meshtech network.
Start by generating a new key and saving it. Go to Networks and click Add. In the popup, click Generate to generate a new random key. Give it a Name you can remember and click Add.
Now we need to provision the gateway to use this key. Go to Gateways, click the Gateway ID of your gateway, and click Provision. Select the network you created in the dropdown and click Provision.
Activate the Gateway
Gateway needs to be activated to work. This is done in the Activation tab by clicking Activate.
Note
If activation is done before provisioning to secure network, gateway will start in legacy mode. It is recommended to provision before activating or unauthenticated legacy data will arrive.
Enable Devices
All Meshtech devices are delivered in Storage mode. To enable a device, wake it up and provision it to the network through the gateway. Enable the extenders first, so that they can relay to the devices further away.
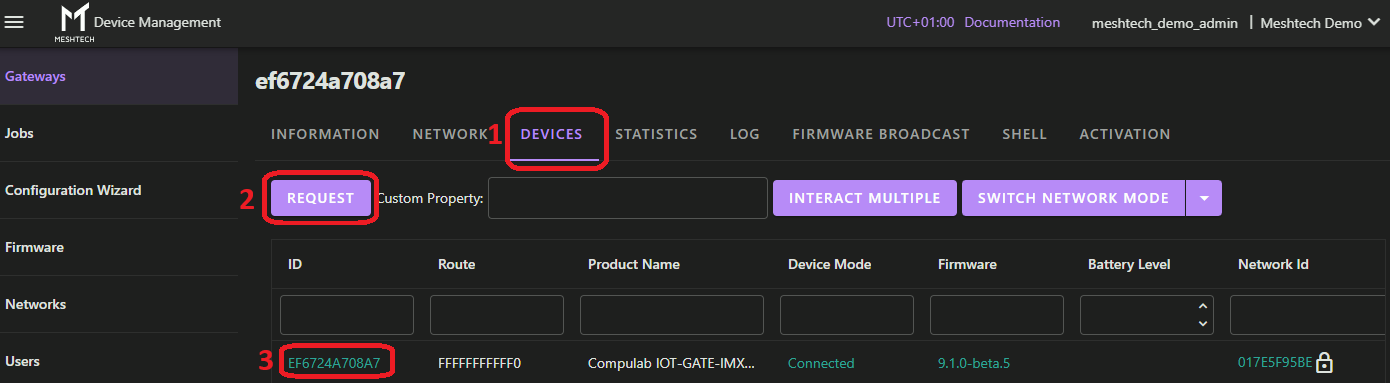
Click the gateway ID of your gateway and select the Devices tab.
Click Switch Network Mode and select Discovery. This makes devices in storage mode visible.
Wake up the device by pressing and holding the button for at least 1 second (the red SOS button on the MWC05). For the Minew MBM01, the green LED lights up, and the device must be provisioned within 5 minutes.
Click Request. The device should appear in the list, in storage mode.
Click the Network ID of the device (“0000000000” for unprovisioned devices). Select the Device Mode from the table below and click Provision.
Repeat steps 3-5 for all devices.
Click Switch Network Mode and select Scan to go back to normal operation.
Device |
Device Mode |
|---|---|
Minew MBM01 0043 |
Connected |
Minew MWB02 0062 |
Unconnected |
Minew MWC05 0066 |
Unconnected |
Extenders join the network within about 20 seconds. Verify this in the Network tab by clicking Request.
Write Properties in the Portal
The remaining configuration is done by writing properties to the gateway and devices. Go to either the Network or Devices tab, click Request (to fetch gateway and nearby network/devices from gateway), then click the MAC address of the gateway or device.
Write the property name in the Property textbox, move the cursor to the Value (JSON) field and fill in the value. Press Write to write the value.
Enable Skyresponse in the Gateway
Write skyresponse-config to the gateway:
{
  "enabled": true
}
Repeat this for all gateways in the installation.
Configure the Alarm Devices
Each alarm device (both the MWB02 and the MWC05 in this tutorial) needs two properties to be written.
First, set alarm-mode to Timestamped:
2
Then configure the transmitter secret using skyresponse-alarm-config. We recommend letting the device generate a random 16-character secret by setting the secret to “r16”:
{
  "secret": "r16"
}
Read back skyresponse-alarm-config to get the generated secret. You need it when configuring the transmitter in Skyresponse. The optional alarmCode can be used to select the type of alarm reported to Skyresponse. See 0x9814 - Skyresponse Alarm Config for supported alarm codes.
For example, a care provider badge such as the MWC05 can be configured with alarmCode set to 101 - Panic alarm, mobile:
{
  "secret": "r16",
  "alarmCode": 101
}
Name the Extenders
While an alarm is active, Skyresponse is updated with the name (alias) of the extender closest to the alarm device. This step is only needed if you want the location of the alarm to be shown in Skyresponse.
Give each extender a name describing its location, by writing add-device-alias to the gateway:
{
  "id": "D46EAC4274C1",
  "alias": "Room 101"
}
id is the MAC address of the extender (uppercase hex). Repeat this for all extenders, including the gateway.
Alternatively, all aliases can be written in one go by writing device-aliases to the gateway. This replaces all existing aliases with the list:
[
  { "id": "D46EAC4274C1", "alias": "Room 101" },
  { "id": "E94141ED7D3E", "alias": "Room 102" }
]
Note
In an installation with multiple gateways, the aliases must be set on all gateways.
Configure Skyresponse
The following must be configured in Skyresponse Admin:
Add a transmitter for each alarm device. In the Create new transmitter dialog, select product category Care Alarms and product Meshtech Alarm Button. Use the MAC address of the device (uppercase hex, e.g.
DE37F160CB39) as the identifier.Copy the secret read back from the device into Transmitter details -> PIN.
Assign the transmitter to an object. Otherwise, the transmitter update request will fail. If the device is not going to be used/assigned, it should be put in storage mode.
Configure the heartbeat alarm. Go to the organization, select Advanced settings and expand Generic. Set
UPDATE_INTERVAL_420to 30min_30sec or 1h. Click Save.
Trigger and Clear an Alarm
In this section we will trigger an alarm on the Minew MWB02 0062 wristband, and clear it using Touchless Alarm Clearing with the Minew MWC05 0066 badge worn by the care provider.
Activate the alarm on the MWB02 by pressing and holding the button down until the device vibrates and the LED blinks.
The alarm should appear in Skyresponse, with the name of the closest extender as location.
Hold the MWC05 close (~40 cm) to the MWB02 and press the small blue button on the MWC05.
The alarm is cleared in the MWB02. The alarm event is then automatically cleared in Skyresponse, and enters the deactivated state.
The alarm can also be cleared using the Skyresponse Response App (iOS, Android) or Portal. The gateway will then clear the alarm in the device on the next alarm sync, typically within 1 minute. See Skyresponse for details.